Rotrics Manual
ROTRICS.COMDownload CenterGet Help in ForumSubmit a Ticket
English
English
  • Rotrics DexArm User Manual V1.2
  • ✨Getting Started
    • 🎮Hands-on Guide
    • 🎨Writing/Drawing
      • Generate G-code with third-party software
    • 🎇Laser Engraving
      • ❗Important - Safety Guideline
    • 🛸3D Printing
      • Generate 3D Printing G-code with Cura
    • 🦾Teach & Pneumatic
    • 📷Computer Vision
    • 🔄Rotary Module
    • Sliding Rail Kit
      • Sliding Rail Kit Installation Guide
    • Conveyor Belt Kit
      • Conveyor Belt Kit Installation Guide
  • 💻Product Overview
    • 🗺️Product Overview
    • 💾Software - Rotrics Studio
    • 🍴Accessories
      • Touchscreen
  • 🔧FAQ & Troubleshooting
    • ❓FAQs
      • Received an Error message in Rotrics Studio?
      • How to toggle developer tools on Rotrics Studio
      • How to re-calibrated DexArm or reset encoder values?
      • How to upgrade DexArm's firmware?
      • How to upgrade the touchscreen firmware?
      • How to send third-party G-code files with Rotrics Studio?
      • How to replace filament?
      • How to set Wi-Fi?
      • How to change touchscreen language?
      • How to execute SD card files?
      • Why can't I copy G-code files to the Touchscreen directly?
      • How to write/draw with different colors?
      • Why it misses part of the image when drawing?
      • How to level DexArm manually?
      • Why my 3D printing module is clogged?
    • 🔑Troubleshooting
      • “G-code sending task started...” Error
      • Laser module won't light
      • Rotrics Studio "Internal error occurred"
      • Failed to upgrade Rotrics DexArm's Firmware
      • Fix the clogged 3D printing nozzle
      • Replace the cracked case
      • How to Fix a Black Screen after upgrading the firmware?
      • DexArm couldn't connect to my computer
      • DexArm beyond limits/stuck problem
      • DexArm movement accuracy problem
      • The pen doesn't write with ink
      • 3D printing module won't heat up
      • The Arm doesn't move, only filament comes out
      • Software connect problem after safety enclosure installed
      • Safety enclosure wiring changes
  • ⌨API(G-code)
    • Introduction
    • Marlin Original Commands
      • [Marlin] G000-G001 - Linear Move
      • [Marlin] G002-G003 - Arc or Circle Move
      • [Marlin] G004 - Dwell
      • [Marlin] G020 - Inch Units
      • [Marlin] G021 - Millimeter Units
      • [Marlin] G028 - Home and StallGuard
      • [Marlin] G029 - Bed Leveling Manual
      • [Marlin] G090 - Absolute Positioning
      • [Marlin] G091- Relative Positioning
      • [Marlin] G092 - Set Position
      • [Marlin] M003 - Laser On
      • [Marlin] M005 - Laser Off
      • [Marlin] M082 - E Absolute
      • [Marlin] M083 - E Relative
      • [Marlin] M092 - Set Axis Steps-per-unit
      • [Marlin] M104 - Set Hotend Temperature
      • [Marlin] M105 - Report Temperatures
      • [Marlin] M106 - Set Fan Speed
      • [Marlin] M107 - Fan Off
      • [Marlin] M108 - Break and Continue
      • [Marlin] M109 - Wait for Hotend Temperature
      • [Marlin] M114 - Get Current Position
      • [Marlin] M200 - Set Filament Diameter
      • [Marlin] M201 - Set Print Max Acceleration
      • [Marlin] M203 - Set Max Feedrate
      • [Marlin] M204 - Set Starting Acceleration
      • [Marlin] M205 - Set Advanced Settings
      • [Marlin] M400 - Finish Moves
      • [Marlin] M410 - Quickstop
      • [Marlin] M420 - Bed Leveling State
      • [Marlin] M500 - Save Settings
      • [Marlin] M501 - Restore Settings
      • [Marlin] M502 - Factory Reset
      • [Marlin] M503 - Report Settings
      • [Marlin] M504 - Validate EEPROM contents
      • [Marlin] M906 - TMC Motor Current
Powered by GitBook
On this page
  • Description
  • Usage
  • Parameters
  • Gallery
  • G3 command geometry
  • examples:

Was this helpful?

  1. ⌨API(G-code)
  2. Marlin Original Commands

[Marlin] G002-G003 - Arc or Circle Move

Previous[Marlin] G000-G001 - Linear MoveNext[Marlin] G004 - Dwell

Last updated 4 years ago

Was this helpful?

📅Update: 2020/09/18

Description

G2 adds a clockwise arc move to the planner; G3 adds a counter-clockwise arc. An arc move starts at the current position and ends at the given XYZ, pivoting around a center-point offset given by I and J or R.

allows G2/G3 to operate in the selected XY, ZX, or YZ workspace plane.

This command has two forms:

I J Form

  • I specifies an X offset. J specifies a Y offset.

  • At least one of the I J parameters is required.

  • X and Y can be omitted to do a complete circle.

  • The given X Y is not error-checked.

    The arc ends based on the angle of the destination.

  • Mixing I or J with R will throw an error.

R Form

  • R specifies the radius. X or Y is required.

  • Omitting both X and Y will throw an error.

  • X or Y must differ from the current XY position.

  • Mixing R with I or J will throw an error.

Arc moves actually generate several short straight-line moves, the length of which are determined by the configuration option MM_PER_ARC_SEGMENT (default 1mm). Any change in the Z position is linearly interpolated over the whole arc.

'ARC_P_CIRCLES' enables the use of the 'P' parameter to specify complete circles

Usage

G2 [E<pos>] I<offset> J<offset> [P<rate>] R<radius> [X<pos>] [Y<pos>] [Z<pos>]

Parameters

  • [E<pos>] The amount to extrude between the start point and end point

  • I<offset> An offset from the current X position to use as the arc center

  • J<offset> An offset from the current Y position to use as the arc center

  • [P<rate>] Specify complete circles - requires ARC_P_CIRCLES

  • R<radius> A radius from the current XY position to use as the arc center

  • [X<pos>] A coordinate on the X axis

  • [Y<pos>] A coordinate on the Y axis

  • [Z<pos>] A coordinate on the Z axis

Gallery

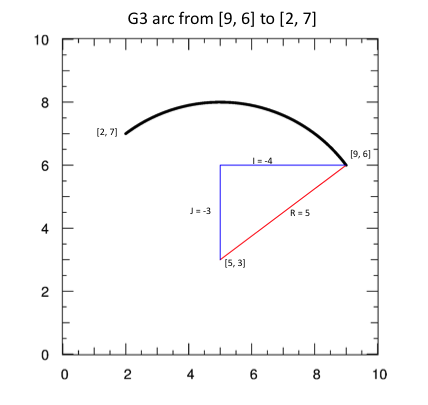
G3 command geometry

This illustrates a counter clockwise arc, starting at [9, 6]. It can be generated either by G3 X2 Y7 I-4 J-3 or G3 X2 Y7 R5
examples:

Move in a clockwise arc from the current position to [125, 32] with the center offset from the current position by (10.5, 10.5).

G2 X125 Y32 I10.5 J10.5

Move in a counter-clockwise arc from the current position to [125, 32] with the center offset from the current position by (10.5, 10.5).

G3 X125 Y32 I10.5 J10.5

Move in a complete clockwise circle with the center offset from the current position by [20, 20].

code: G2 I20 J20
avatar
CNC_WORKSPACE_PLANES